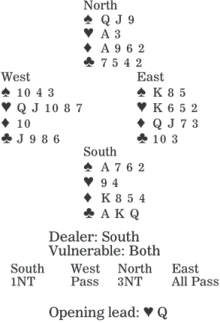
As you know, there are several aphorisms about bridge. For example, "second hand low" and "third hand high," which are right most of the time. This week, let's look at "cover an honor with an honor."
Today's deal is a textbook example. How does the play go in three no-trump after West leads the heart queen?
South is loath to open one no-trump with a low doubleton, but the bid describes his hand type and strength so accurately.
Declarer starts with seven top tricks: one spade, one heart, two diamonds and three clubs. If the clubs break 3-3, that will provide an eighth winner. Then, if the spade finesse works, the contract will make. With the heart suit wide open, South cannot afford to give up a diamond. So, declarer wins the second heart and cashes his top clubs. Now East must be careful, discarding a diamond.
Has East made an error, throwing a diamond from an initial three-card holding (so diamonds are now 2-2)? South takes his diamond king, then plays a diamond to dummy's ace. Again luck is out to lunch - West accurately throws a heart.
It is time for spades. Declarer calls for dummy's queen. Note that if East covers with the king, South wins with his ace, then leads a low spade to dummy's nine. That finesse works too, and declarer makes his contract with three spades, one heart, two diamonds and three clubs. But if East plays low, the contract can be defeated.
This is the rule that works most of the time: Cover not the first but the last of touching honors. East ducks dummy's first spade honor, but if South continues with the second, East covers.
Copyright 1995 - . All rights reserved. The content (including but not limited to text, photo, multimedia information, etc) published in this site belongs to China Daily Information Co (CDIC). Without written authorization from CDIC, such content shall not be republished or used in any form. Note: Browsers with 1024*768 or higher resolution are suggested for this site.
License for publishing multimedia online 0108263 Registration Number: 20100000002731 ![]()


 Raymond Zhou:
 Pauline D Loh:
 Hot Pot
 Eco China
 China Dream
 China Face